Introducing the vibrant Summer Nails Orange 2024 collection, infusing your fingertips with a burst of vivid hues. Explore a diverse array of designs, from elegantly understated to dazzlingly adorned, catering to every nail style and contour. Whether you opt for sleek gel or bold summer acrylic, accentuate with neon pops or soothing pastels for an effortlessly chic, getaway-inspired aesthetic.
Advertisement
Bright Matte Orange With Floral Accents
In the fourth image, a vibrant matte orange base is beautifully contrasted with delicate flowers drawn over one accent nail, offering a playful and chic look. This design is perfect for summer festivities and can add a pop of cute and creative flair to any outfit.
Advertisement
Consumables List:
- Base Coat: Butter London Nail Foundation
- Matte Orange Polish: NYX Professional Makeup Matte Nail Polish in “Summer Flame”
- Floral Design: White and pink acrylic paint
- Matte Top Coat: Matte Finish by Essie
Matte finishes are great for those who prefer a non-glossy look but still want to make a bold statement. Adding hand-painted flowers brings a personal touch that truly stands out.
Orange Pop With Polka Dots
The fifth image features bright orange nails sprinkled with playful white polka dots, encapsulating the joyful essence of summer. This cute and simple design is incredibly easy to achieve and adds an instant charm to your summer wardrobe.
Advertisement
Consumables List:
- Base Coat: Chanel Base Protectrice
- Orange Polish: China Glaze in “Papaya Punch”
- White Dots: Dotting tool with Essie’s “Blanc”
- Top Coat: OPI Top Coat
Polka dots are a timeless pattern that is both fun and stylish. They are perfect for those looking for an easy yet impactful nail design.
DIY Polka Dot Nail Art
To get this fun look:
- Start with a base coat to protect your nails.
- Apply two coats of the orange polish for a vibrant base.
- Dip a dotting tool in white polish and gently apply to create polka dots.
- Finish with a clear top coat to seal the design and add gloss.
Classic Glossy Orange
The simplicity and elegance of a pure glossy orange nail, as shown in the sixth image, brings a classic and timeless charm to summer fashion. These nails are shaped into a refined almond style, making them versatile for both casual and formal occasions.
Advertisement
Consumables List:
- Base Coat: OPI Natural Nail Base Coat
- Orange Polish: Chanel Le Vernis Longwear Nail Colour in “Holiday”
- Top Coat: Essie Gel Setter Top Coat
Using a high-quality polish like Chanel’s “Holiday” ensures a rich color payout and long-lasting wear, perfect for summer’s busy days.
How to Achieve Perfect Glossy Nails
To recreate this vibrant look:
- Start with a smooth, clean nail surface and apply a base coat to prevent staining.
- Apply two coats of the orange polish, allowing each coat to fully dry.
- Finish with a glossy top coat for a durable and shiny appearance.
Orange With Black Speckles
Image seven introduces a playful twist with black speckles over a bright orange base. This design is fun and youthful, ideal for beach parties or summer festivals.
Advertisement
Consumables List:
- Base Coat: Sally Hansen Hard as Nails Base Coat
- Orange Polish: Essie’s “Tart Deco”
- Black Speckles: Dotting tool with OPI’s “Black Onyx”
- Top Coat: Revlon ColorStay Gel Envy Diamond Top Coat
Adding speckles is a simple way to create a textured look that’s both eye-catching and easy to achieve.
DIY Tips for Speckled Nail Art
To get this speckled design:
- Apply a base coat to protect your nails.
- Paint the nails with the orange polish as the base color.
- Use a dotting tool to apply small dots of black polish randomly across each nail.
- Seal with a top coat for a smooth, lasting finish.
Neon Orange With Crystal Embellishments
The eighth image showcases neon orange nails made more striking with a line of crystal embellishments. This look is bold and attention-grabbing, perfect for those who love to stand out.
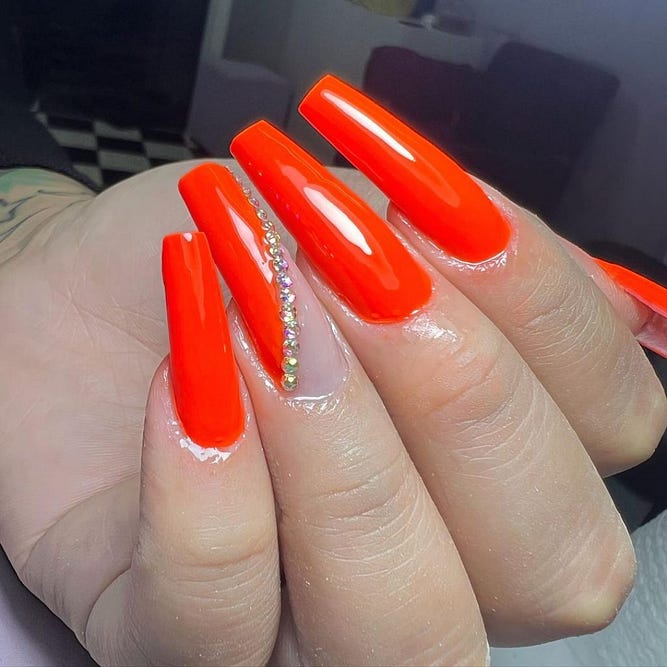
Consumables List:
- Base Coat: Base Coat by Orly
- Neon Orange Polish: China Glaze in “Orange Knockout”
- Crystals: Swarovski Small Crystal Pack
- Top Coat: Seche Vite Dry Fast Top Coat
Embellishments like Swarovski crystals add a luxurious element to any nail design, making it pop.
Creating Embellished Neon Nails
To achieve this embellished look:
- Prepare your nails with a base coat.
- Apply two coats of the neon orange polish.
- While the second coat is still tacky, carefully place the crystals along one nail for an accent.
- Secure the design with a durable top coat to ensure the embellishments stay in place.
Orange And White Marble Design
The ninth image features a stunning marble design combining white and orange, creating a sophisticated and artistic look. This style is great for those seeking a unique and creative nail art design for summer events.
Consumables List:
- Base Coat: Smith & Cult Nail Primer
- Orange Polish: Butter London in “Jaffa”
- White Polish: Zoya in “Snow White”
- Detailing Tool: Fine-tip nail art brush
- Top Coat: CND Vinylux Weekly Top Coat
Marble effects are achieved by artistically swirling two contrasting colors, providing a beautiful, natural pattern on each nail.
How to Make Marble Nail Art
To create this marble effect:
- Begin with a base coat to protect the nails.
- Apply a light layer of orange polish as the base.
- Drop small blobs of white polish onto the wet base.
- Use a fine-tip brush to swirl the colors together gently.
- Finish with a top coat for gloss and protection.
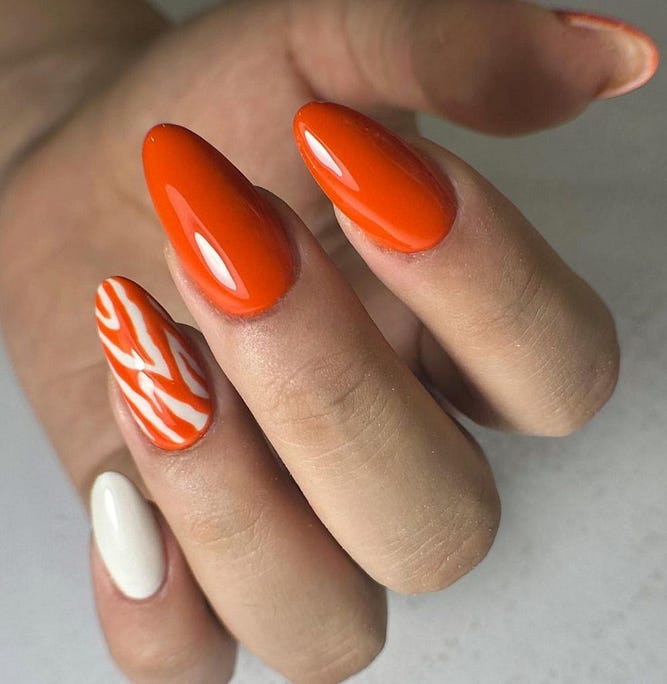
Orange With Animal Print Accents
The tenth image combines a bright orange base with bold black animal print accents on select nails, offering a trendy and dynamic look for adventurous spirits this summer.
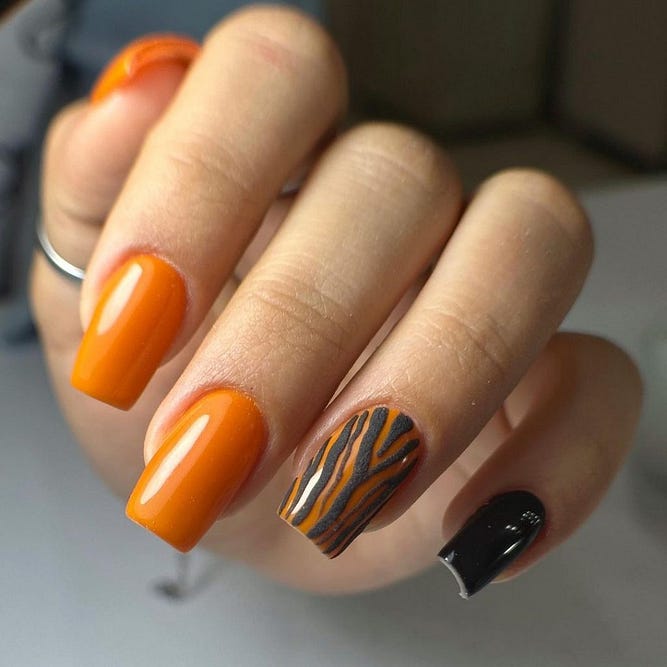
Consumables List:
- Base Coat: Deborah Lippmann Hard Rock
- Orange Polish: Sally Hansen Insta-Dri in “Slick Slate”
- Black Paint for Animal Print: Acrylic paint
- Top Coat: OPI Top Coat
Animal prints are a fun way to add an exotic touch to your nails, making them a focal point of your summer style.
Guide to Creating Animal Print Nail Art
To get this adventurous look:
- Start with a base coat to protect and smooth your nails.
- Apply the orange polish as the base color.
- Paint the animal print on accent nails using black and white acrylic paint with a thin brush.
- Apply a top coat to seal in the design and add shine.
Fruit-Themed Nail Art
Image eleven showcases a playful and colorful approach with fruit-themed nail art on a transparent base. This design uses summer gel nails as a canvas for intricate lemon, watermelon, and kiwi slices, creating a deliciously vibrant summer vibe.
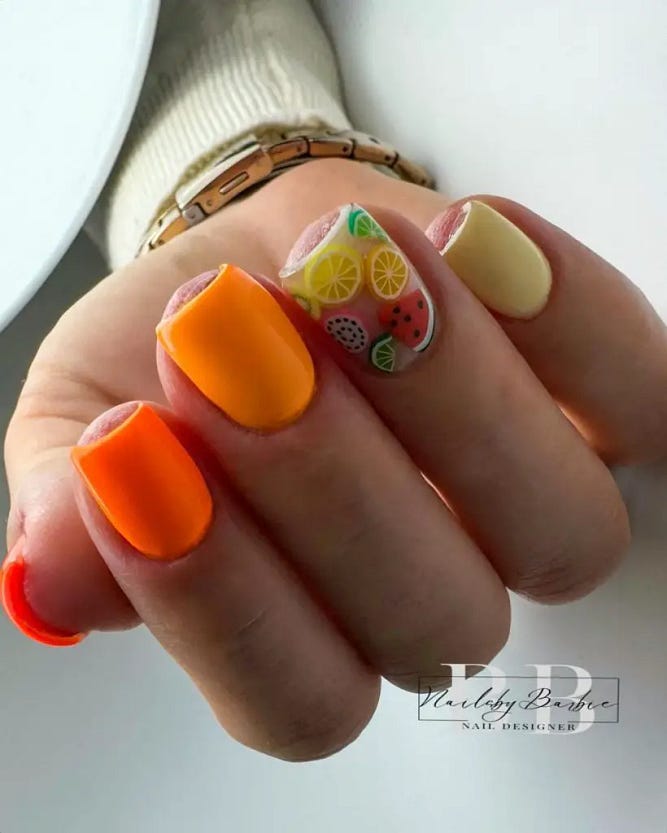
Consumables List:
- Base Coat: Essie All in One
- Gel Polishes: Various colors for fruit designs
- Top Coat: Gelish Top It Off Sealer
- Nail Art Tools: Fine brushes and dotting tools
This design is perfect for those who enjoy a burst of colors and fun patterns, blending neon and pink hues with the orange base.
Creating Fruit-Themed Nail Art
To achieve this look:
- Apply a clear base coat.
- Paint fruit designs using gel polishes and nail art tools.
- Seal with a gel top coat to ensure longevity and gloss.
Matte Orange For Everyday Wear
The twelfth image demonstrates the elegance of a matte orange finish, providing a contemporary twist to the classic glossy look. The short, squared shape makes this style very practical and suitable for everyday wear, embodying the simple and cute aesthetic.
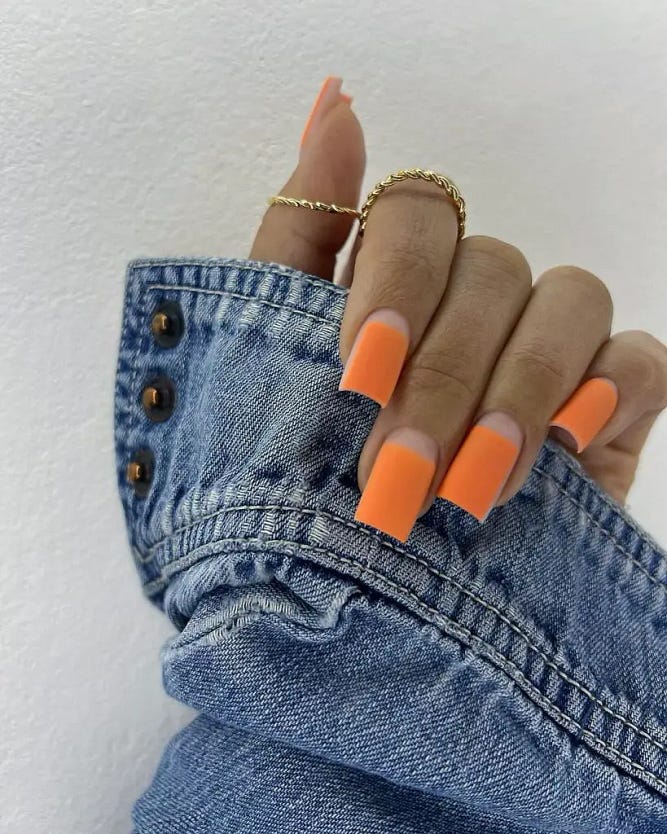
Consumables List:
- Base Coat: Zoya Anchor Base Coat
- Matte Orange Polish: OPI in “Fighting for Orange”
- Matte Top Coat: Matte About You by Essie
The matte finish is ideal for those who prefer a subtle yet chic look, perfect for complementing summer outfits.
How to Achieve a Matte Finish
- Apply a base coat to clean, prepped nails.
- Paint two coats of the orange polish.
- Finish with a matte top coat for a sleek look.
Ombre And Rhinestones
Image thirteen offers a stunning gradient effect from yellow to orange, embellished with delicate rhinestone clusters at the base. This design combines the warmth of the sun with the sparkle of bling, making it a dazzling choice for summer nights.

Consumables List:
- Base Coat: Orly Bonder
- Yellow and Orange Polishes: Sally Hansen in “Mellow Yellow” and “Sun Kissed”
- Rhinestones: Assorted sizes
- Top Coat: INM Out the Door
Adding rhinestones elevates the look, making it more luxurious and eye-catching.
DIY Ombre Nail Art Tips
- Apply a base coat.
- Use a sponge to apply a gradient of yellow and orange polish.
- Add rhinestones while the polish is tacky.
- Seal with a top coat for durability.
Pastel Play
The fourteenth image features a lovely contrast between pastel blue and bold orange, giving a fresh and youthful look. The short nail length and soft matte finish provide a simple yet stylish appeal, great for those who enjoy a subtle color play.
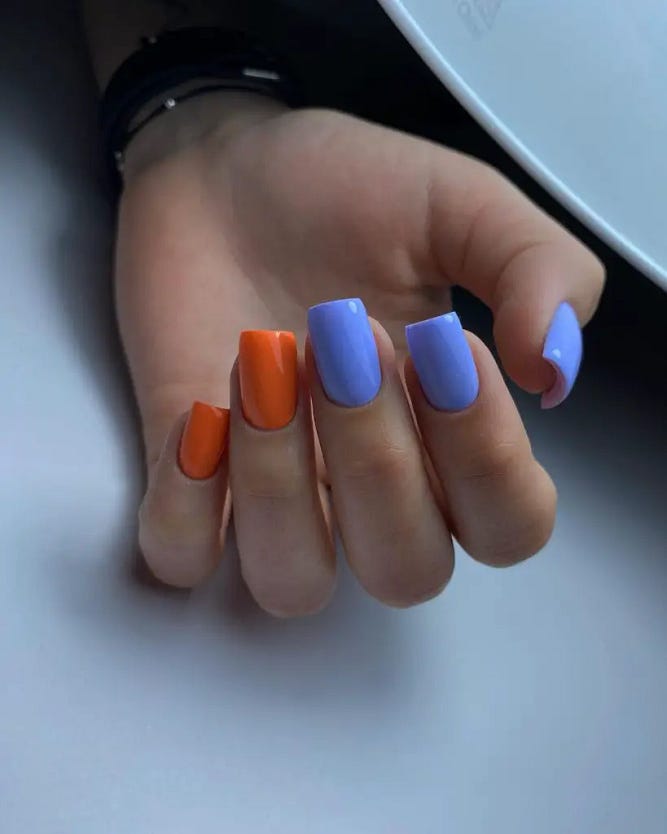
Consumables List:
- Base Coat: Butter London Nail Foundation
- Pastel Blue and Orange Polishes: Essie in “Bikini So Teeny” and “Tart Deco”
- Matte Top Coat: OPI Matte Top Coat
This nail design is perfect for casual summer days and can be dressed up or down depending on the occasion.
Creating Soft Pastel Nails
- Apply a base coat.
- Alternate pastel blue and orange polish on each nail.
- Finish with a matte top coat for a modern look.
Elegant Orange French Tips
The fifteenth image revamps the traditional French tip with a vibrant orange hue, edged over a soft nude base. This elegant look is enhanced with a rhinestone strip, adding a touch of bling to a classic design.
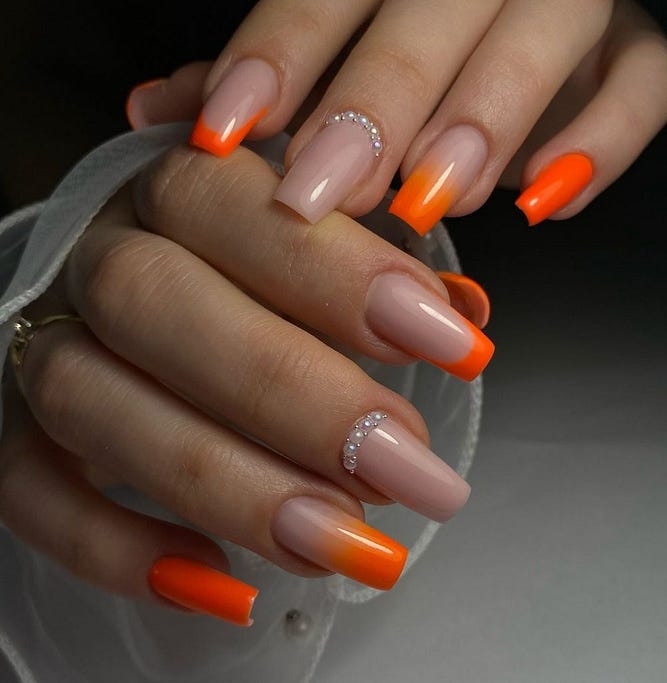
Consumables List:
- Base Coat: Chanel Base Protectrice
- Nude Polish: OPI in “Bubble Bath”
- Orange Tip Polish: Essie in “Geranium”
- Rhinestones: Thin strip
- Top Coat: Chanel Gel Top Coat
The combination of nude and orange offers a chic update to the French manicure, making it suitable for both everyday wear and special occasions.
How to Paint Orange French Tips
- Apply a base coat and a nude base color.
- Paint the tips with orange polish.
- Add a strip of rhinestones for decoration.
- Seal with a top coat for a glossy finish.


0 Comments