Step into summer with summer white toe nail designs 2024, showcasing classy pedicure ideas. Our gel summer white toe nail designs feature delicate flowers in pink, gold, and blue, complemented by sparkling silver glitter. These toenails are perfect for beach outings, offering simple yet sophisticated art ideas. Discover the best polish colors and designs to create stunning toenails pedicure ideas that are perfect for a stylish and elegant summer look.
Advertisement
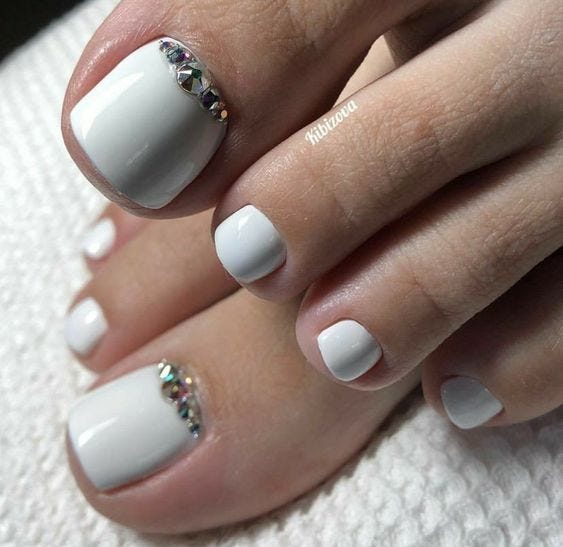
A Touch Of Glamour: Crystal-Embellished White
Professional Opinion: This nail design elevates the pure white look with strategic placement of multi-colored crystals along the cuticle line, providing a luxurious yet understated adornment. It’s an elegant choice for those summer occasions that call for a touch of sparkle without overpowering simplicity.
Advertisement
Consumables:
- Opaque white nail polish
- Crystal embellishments in various sizes
- Nail glue to secure the crystals
- High-gloss top coat for shine and protection
DIY Tips: After your base coat and two layers of white polish, use a dot of nail glue on each nail’s cuticle line and carefully place your crystals. Finish with a top coat to add shine and ensure the longevity of your design.
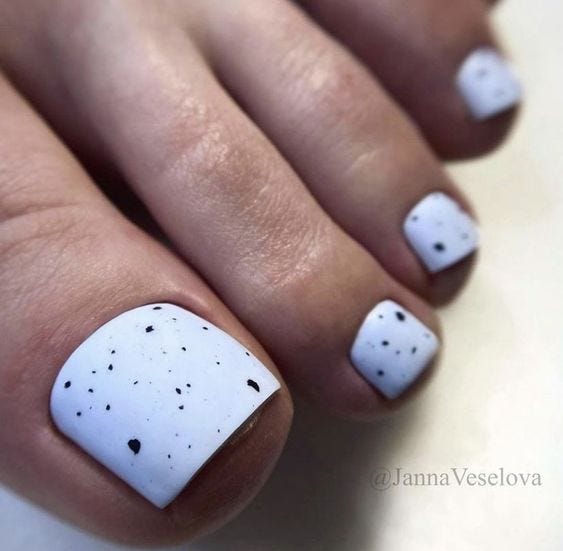
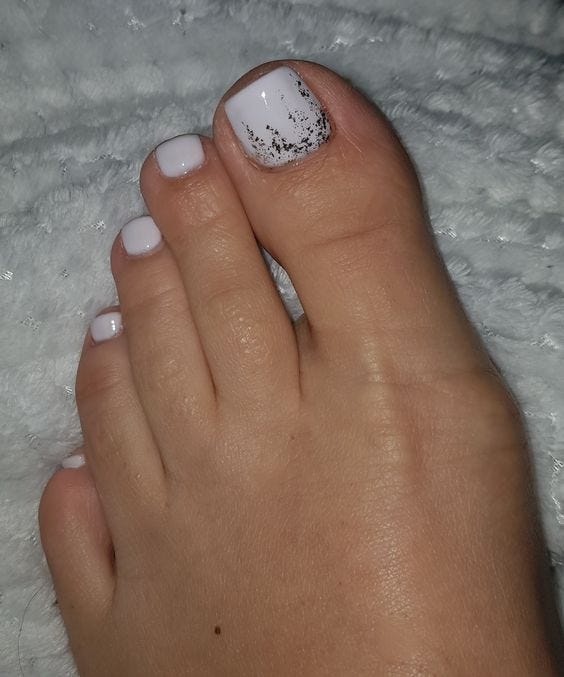
Modern Artistry: Speckled White
Professional Opinion: This design features a matte white base with a smattering of black specks, evoking a modern art feel. The speckles give the toes character and break the monotony of a single color without being too bold, perfect for pairing with contemporary summer wear.
Advertisement
Consumables:
- Matte white nail polish
- Black nail polish for the speckles
- A thin brush or dotting tool
- Matte top coat for finish
DIY Tips: Start with the matte white as your base. Dip your tool into the black polish and gently add specks to each nail. Seal your artwork with a matte top coat for a cohesive and enduring finish.
Elegance In Veins: Marble Detailed White
Professional Opinion: Marble designs in nail art are a testament to sophistication, and this image perfectly captures that essence. The swirls of gray over white mimic natural marble, creating a luxurious and artistic effect on the nails that’s fitting for any summer gala.

Advertisement
Consumables:
- White nail polish as the base color
- Gray nail polish for marbling
- A detail brush for intricate designs
- A glossy top coat for depth and protection
DIY Tips: Paint your nails white, then while still wet, add drops of gray and swirl with a brush to achieve the marble effect. Work quickly to ensure the polishes blend well. Finish with a glossy top coat to enhance the marble look.
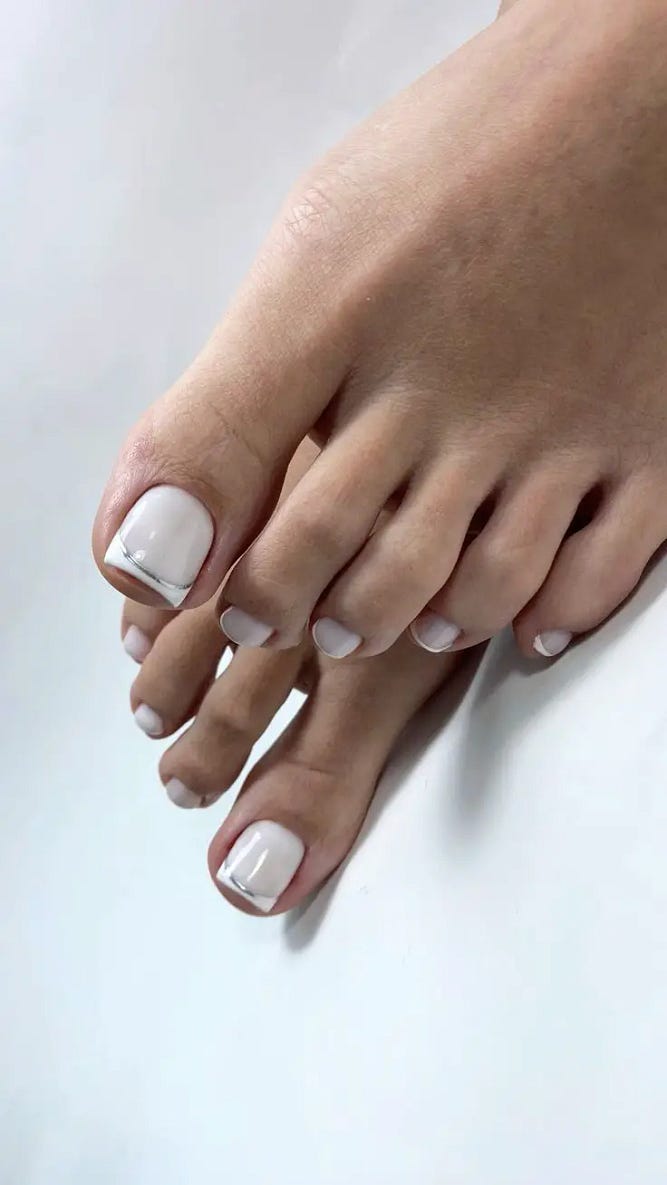
Minimalist With An Edge: Sharp White With A Single Band
Professional Opinion: A stark white polish creates a clean, fresh look. This design is minimalistic yet bold, offering a chic statement that is perfect for both daytime and evening summer events.
Consumables:
- White nail polish for the base
- Black striping tape or polish for the band
- Clear top coat to secure the design
DIY Tips: After the white base, apply the striping tape across the big toenail or use a thin brush to paint the band. Apply a clear top coat to ensure the stripe remains intact and adds an extra gloss to the overall design.
Dazzling Tip: Glitter Gradient
Professional Opinion: This image shows how a simple white toenail can be transformed with a touch of glitter, creating a gradient that resembles sparkling sand. It’s a festive and fun design, perfect for those carefree beach days and summer parties.
Consumables:
- White nail polish for the base
- Glitter polish for the gradient effect
- A sponge for application
- A top coat for lasting wear
DIY Tips: Paint a solid white base. Then, using a sponge, dab glitter polish starting at the tip, working up to create a gradient effect. Finish with a top coat to set the glitter in place and add a glossy finish.
Artistic Flair: Stained-Glass Precision
Professional Opinion: This nail design transforms the nails into a vivid canvas reminiscent of a stained-glass window. The white base provides a stark contrast that makes the colorful patterns pop, offering a playful yet refined addition to any summer outfit.
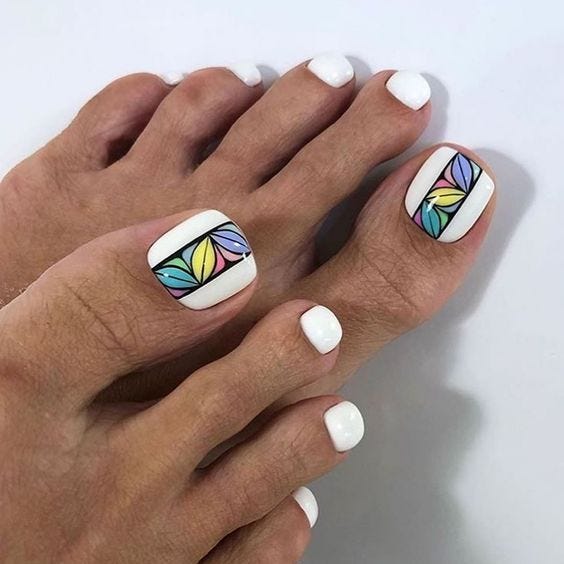
Consumables:
- White nail polish for the base
- Multi-colored nail polishes for the stained-glass effect
- Thin nail art brush for precise lines
- Top coat for a gleaming finish
DIY Tips: Begin with a base coat and white polish. Once dry, use a thin brush to create the stained-glass shapes, filling in each section with a different color. A steady hand and patience will yield the best results. Finish with a top coat to add shine and protect the design.
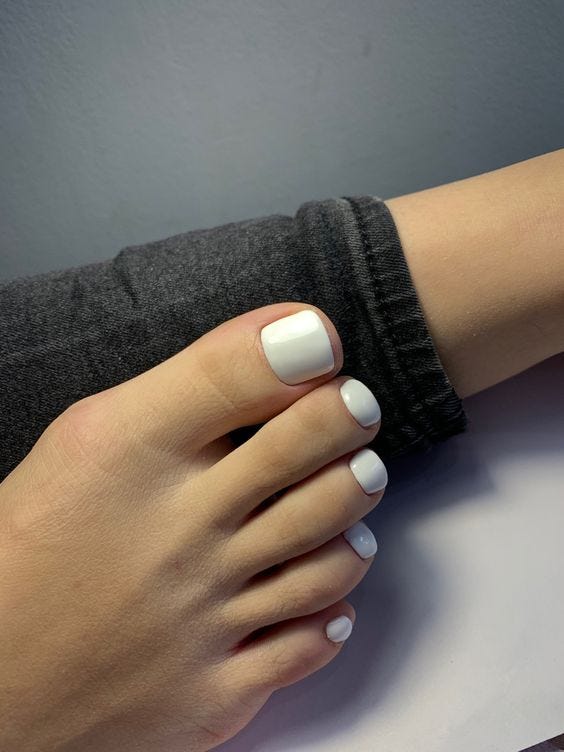
Sleek And Sophisticated: Square And Solid
Professional Opinion: This straightforward yet chic design features a solid white polish over squared nails, signifying a return to classic beauty. The impeccably applied polish provides a look of sleek sophistication, a testament to the elegance that white can carry on its own.
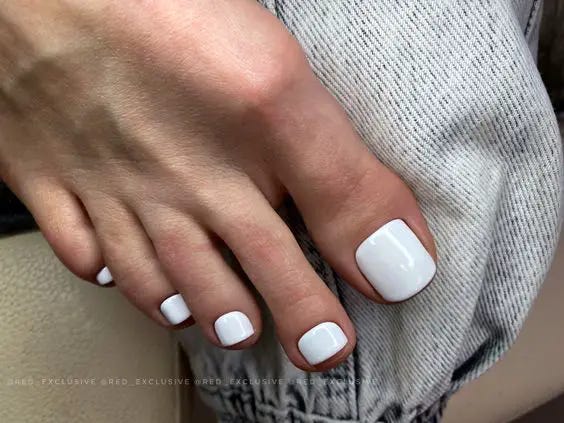
Consumables:
- Opaque white nail polish
- Base coat to prevent staining
- Glossy top coat for a durable, shiny finish
DIY Tips: Prep your nails with a base coat to ensure a smooth application. Paint two coats of the white polish, waiting for the first to dry before applying the second. Once dry, apply a glossy top coat to seal in the color and add a protective layer for lasting wear.
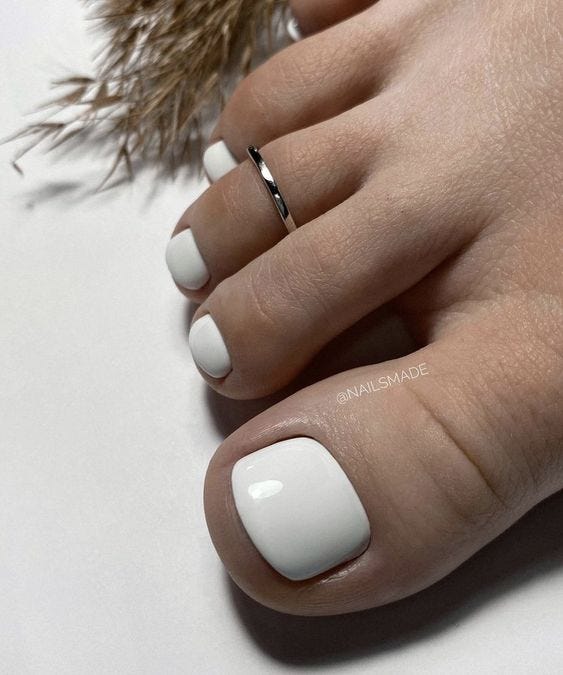
Gleaming Sophistication: A Shine That Dazzles
Professional Opinion: This design takes luxury to your toes with its brilliant glossy finish that embodies the purity of summer. The broad, flawlessly applied white creates an impression of open skies and pristine sands, with a toe ring adding just the right amount of opulence.
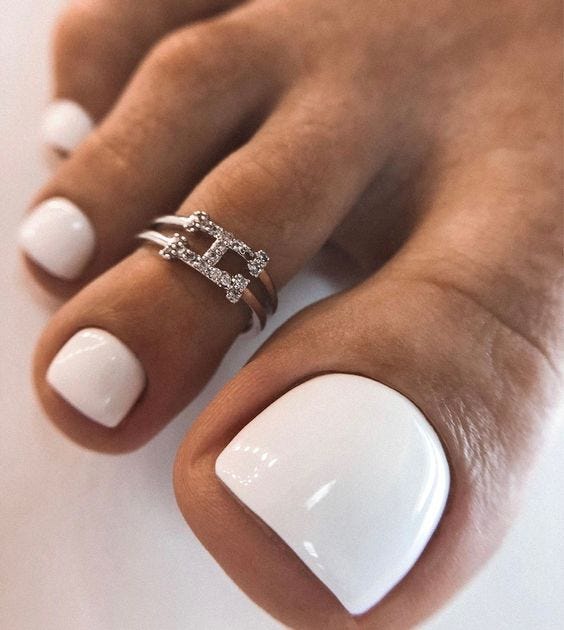
Consumables:
- Ultra-glossy white gel polish
- Protective base coat
- Quick-dry top coat for a lasting sheen
- Silver toe ring for that sparkle
DIY Tips: Begin with a base coat to protect your nail. Follow with two coats of white gel polish for that rich opacity. After curing, add a top coat for extra gloss. Accessorize with a toe ring as the final flourish for a dazzling summer look.
Shimmering Delight: Sparkles For Sunny Days
Professional Opinion: A subtle sparkle across a soft white base brings the magical twinkle of starry nights to your toes. This design is perfect for adding a hint of playfulness to your summer whites without overwhelming the simplicity of the color.
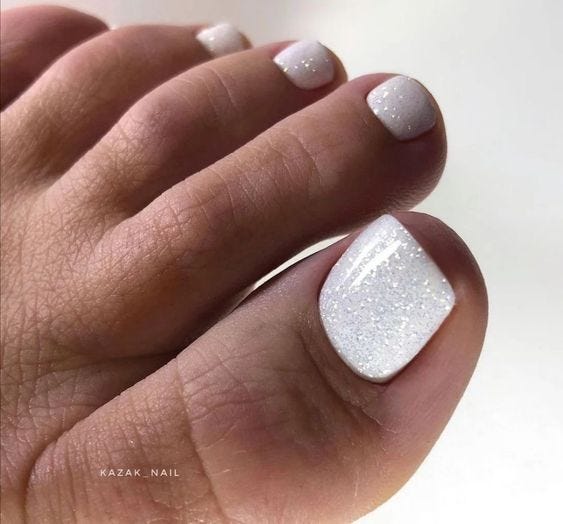
Consumables:
- White nail polish with a shimmer finish
- Glitter top coat for added sparkle
- Base coat to prevent staining
DIY Tips: Apply your base coat, then two layers of the shimmer-infused white polish. Finish with a glitter top coat on the big toe for a delightful contrast and a touch of enchantment to your step.
Trendsetter’s Texture: Confetti For Your Toes
Professional Opinion: White takes on a new personality with this texturized approach, featuring flecks of blue and silver, giving the impression of a festive confetti sprinkle. This style is an excellent choice for those who favor a playful yet sophisticated look for their summer escapades.
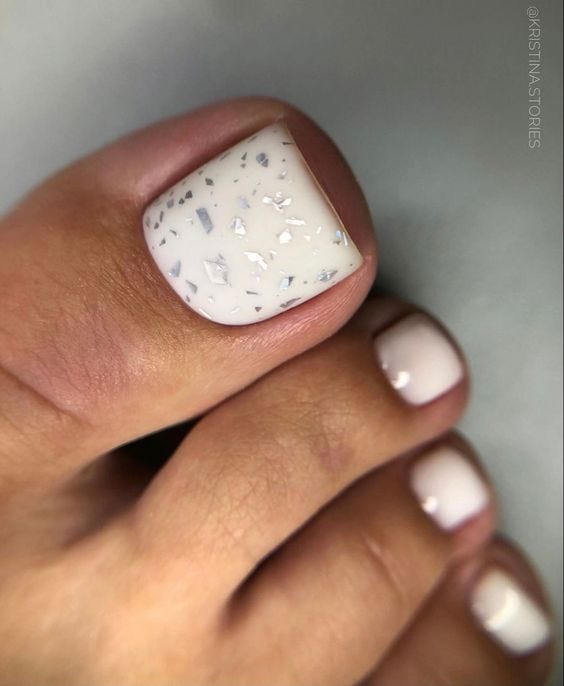
Consumables:
- Textured white nail lacquer
- Blue and silver nail confetti
- Clear sealing top coat
DIY Tips: Once you’ve applied a base coat, add a layer of the textured polish. Sprinkle on the confetti while it’s still tacky, then seal everything in with a sturdy top coat for a finish that’s both intriguing and durable.
Effortless Elegance: White With A Whisper Of Gradient
Professional Opinion: Here we see a masterful blend of pure white softening into a clear tip, a look that whispers elegance and poise. The delicate gradient suggests a mindful appreciation for nuanced style, suitable for serene beachside strolls or chic summer soirées.
Consumables:
- White nail polish for the gradient
- Sponge for application
- Clear polish for blending and shine
- Top coat for durability
DIY Tips: Apply a clear base coat, then use a sponge to lightly dab white polish from the nail bed upwards, creating a gradient effect. Blend the transition with clear polish and finish with a protective top coat.
Casual Cool: Matte White Meets The Softness Of Fabric
Professional Opinion: This design speaks to those who revel in the intersection of comfort and style. The matte white polish, reminiscent of cozy cotton or soft linen, offers a refreshing respite from the gloss and glitter, asserting a confident, understated poise.
Consumables:
- Matte white nail polish
- Base coat for longevity
- Matte top coat for extra protection
DIY Tips: After the base coat, sweep on the matte white polish. When dry, apply a matte top coat to enhance the effect and protect your nails. This look is all about the tactile allure of a soft-touch finish.
Minimalist Chic: A Canvas Of Possibilities
Professional Opinion: In this image, the toenails are adorned with a classic white polish, radiating an aura of minimalist chic. The nails are trimmed to a soft, natural shape, and the polish is applied with precision, leaving a hint of translucency that suggests delicate care.
Consumables:
- Semi-transparent white polish
- Strengthening base coat
- High-shine top coat
- Cuticle oil for a perfect finish
DIY Tips: To replicate this serene look, start with a nourishing base coat to fortify your nails. Apply two thin layers of semi-transparent white polish, allowing each layer to dry completely. Finish with a high-shine top coat for a glossy surface that catches the summer light.
Plush Elegance: White In Luxe Comfort
Professional Opinion: Embracing the plushness of fur against the stark contrast of glossy white nails gives a sense of luxury. The broad application on the big toenail serves as a statement piece, while the remaining nails are kept simple, creating a balance between bold and understated.
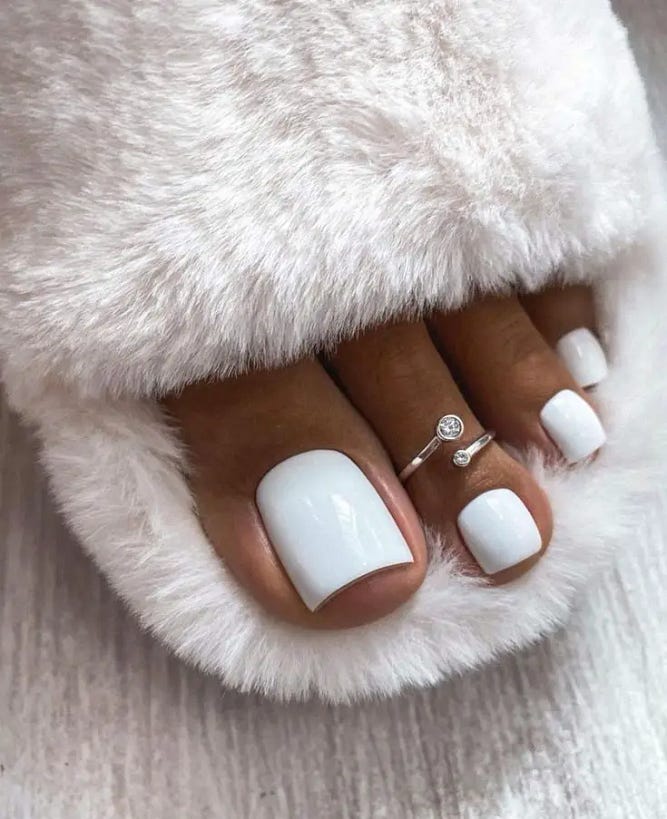
Consumables:
- Full-coverage white gel polish
- Plush accessory for styling
- Long-lasting top coat
DIY Tips: Coat your nails with a solid layer of gel polish for that impeccable white. The key is to achieve a full-coverage look that speaks volumes of elegance. Finish with a top coat that promises longevity and a lustrous sheen.
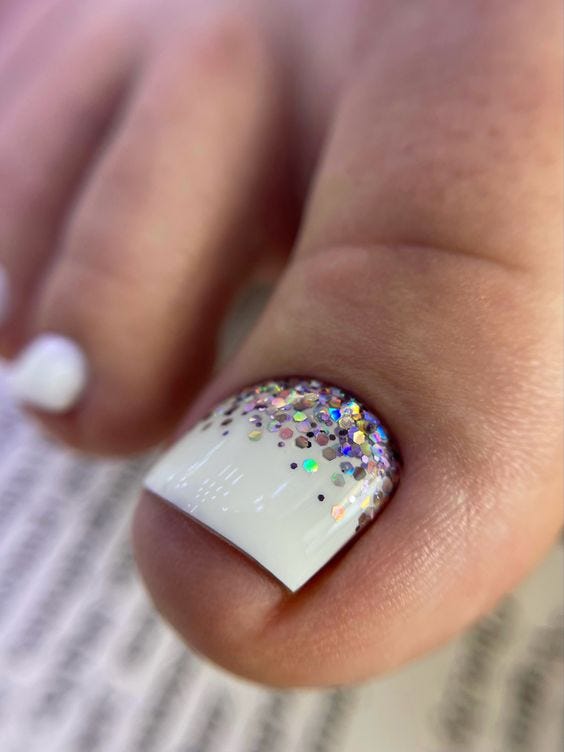
Glittering Frost: Sparkle On The Tips
Professional Opinion: The sparkle on the tips of these nails resembles a frosty morning, adding a special touch to the classic white. The contrast between the matte nail bed and the glittery tips creates a dynamic look, perfect for any summer event.
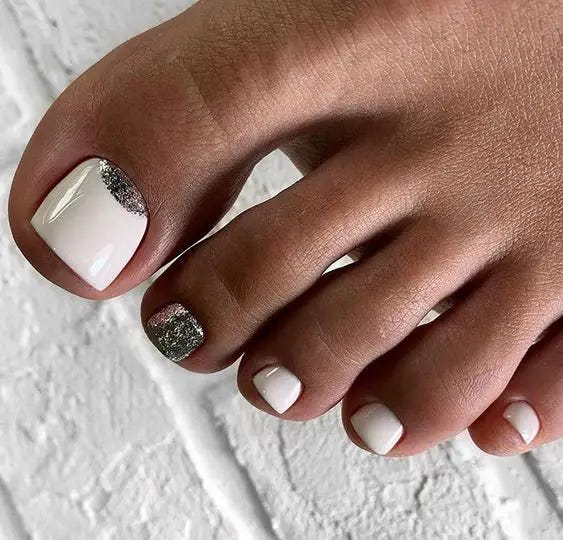
Consumables:
- Matte white polish for the base
- Silver glitter polish for the tips
- Top coat for sealing the design
DIY Tips: First, apply a matte polish as your base. Once it’s dry, carefully apply the glitter polish to the tips, creating a gradient effect for a soft transition. Seal your design with a top coat to ensure the glitter stays in place through all your summer adventures.


0 Comments